Troubleshooting DC Power – DC Cavitator Amps Output is 0.0 on iBall Gas Chart
In specific cases, the DC Amps on the Real-Time Screen, or on the face of the Bloodhound measures 0.0 Amps. There are several potential causes of this including a tripped circuit breaker, or a bad fuse. This article discusses how to test for these scenarios, and provides several solutions to handling them.
PREREQUISITES:
1) You must be on-site with the Bloodhound – this exercise is not a remote tutorial.
2) You must have an iBall Instruments DC Cavitator that is or can be plugged into the Bloodhound’s power ports for this tutorial to make sense. If you do not, you don’t need to worry about the fact that there is a 0.0 Amps reading on the Bloodhound.
3) You must have a view to the “real-time” data on the Bloodhound, either through the iBall Instruments Gas Chart software or through the iBall Instruments Stand Alone Real-Time Data Viewer application. Either will suffice.
4) OPTIONAL: You may need to have iBall Instruments stand alone “Real-Time Data Viewer” (RTDV) installed for calibration of the on-board Ammeter.
5) OPTIONAL: You may need an administrative login for the Bloodhound, which can be obtained by contacting your mud logging company’s Bloodhound technical person(s).
HOW-TO:
1) Confirm the “0.0 Amps” reading on the Bloodhound:
a) If you’re using iBall Instruments Gas Chart software, you can right-click on the page to bring up the “Gas Chart Control Box”, and click the “Real-Time Data” button.
b) If you’re using iBall Instruments Stand Alone Real-Time Data Viewer, make sure you are properly connected to the Bloodhound in question, and click the “More Data” button to bring up the full display of real-time data.
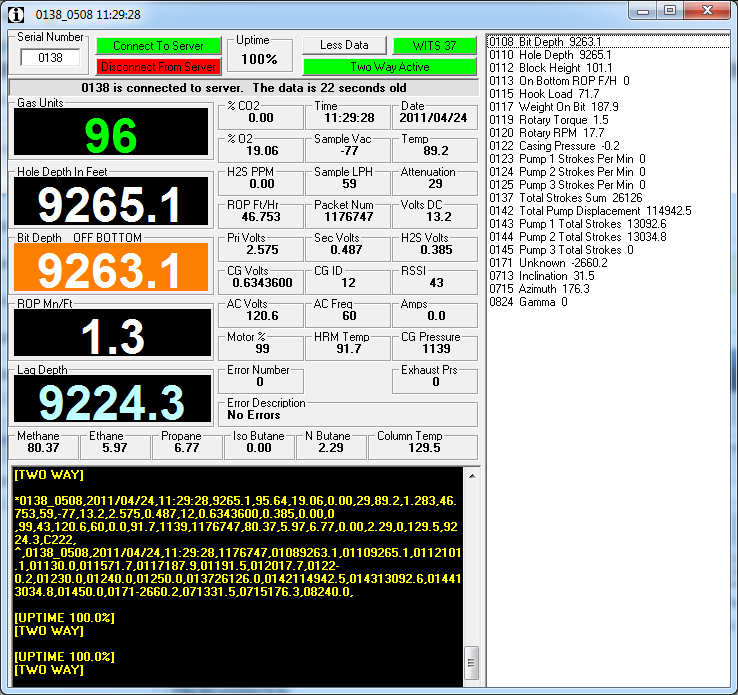
c) In the right-hand column of data (the top item is “Date”, 7th down is a field entitled, “Amps”. If this value is indeed “0.0” as shown in the screen capture below, proceed to the next step:
2) Examine your iBall Instruments DC Cavitator:
a) If you don’t have an iBall Instruments DC Cavitator plugged into the Bloodhound (for example, you’re using an AC cavitator plugged in elsewhere), you can disregard the 0.0 amperage reading as it doesn’t affect your ability to log the well.
b) If your cavitator is running, and you are reading 0.0 amps, the sensor that reads amperage in the Bloodhound is broken or mis-calibrated. As long as your DC Cavitator is operating peoperly, you can disregard this reading. If this is the case, please make a note of this when returning the Bloodhound to the manufacturer at the end of the well so that it can be addressed when back in the shop.
c) If your DC Cavitator is not operating, verify it is connected to the proper DC terminals shown in the figure below:
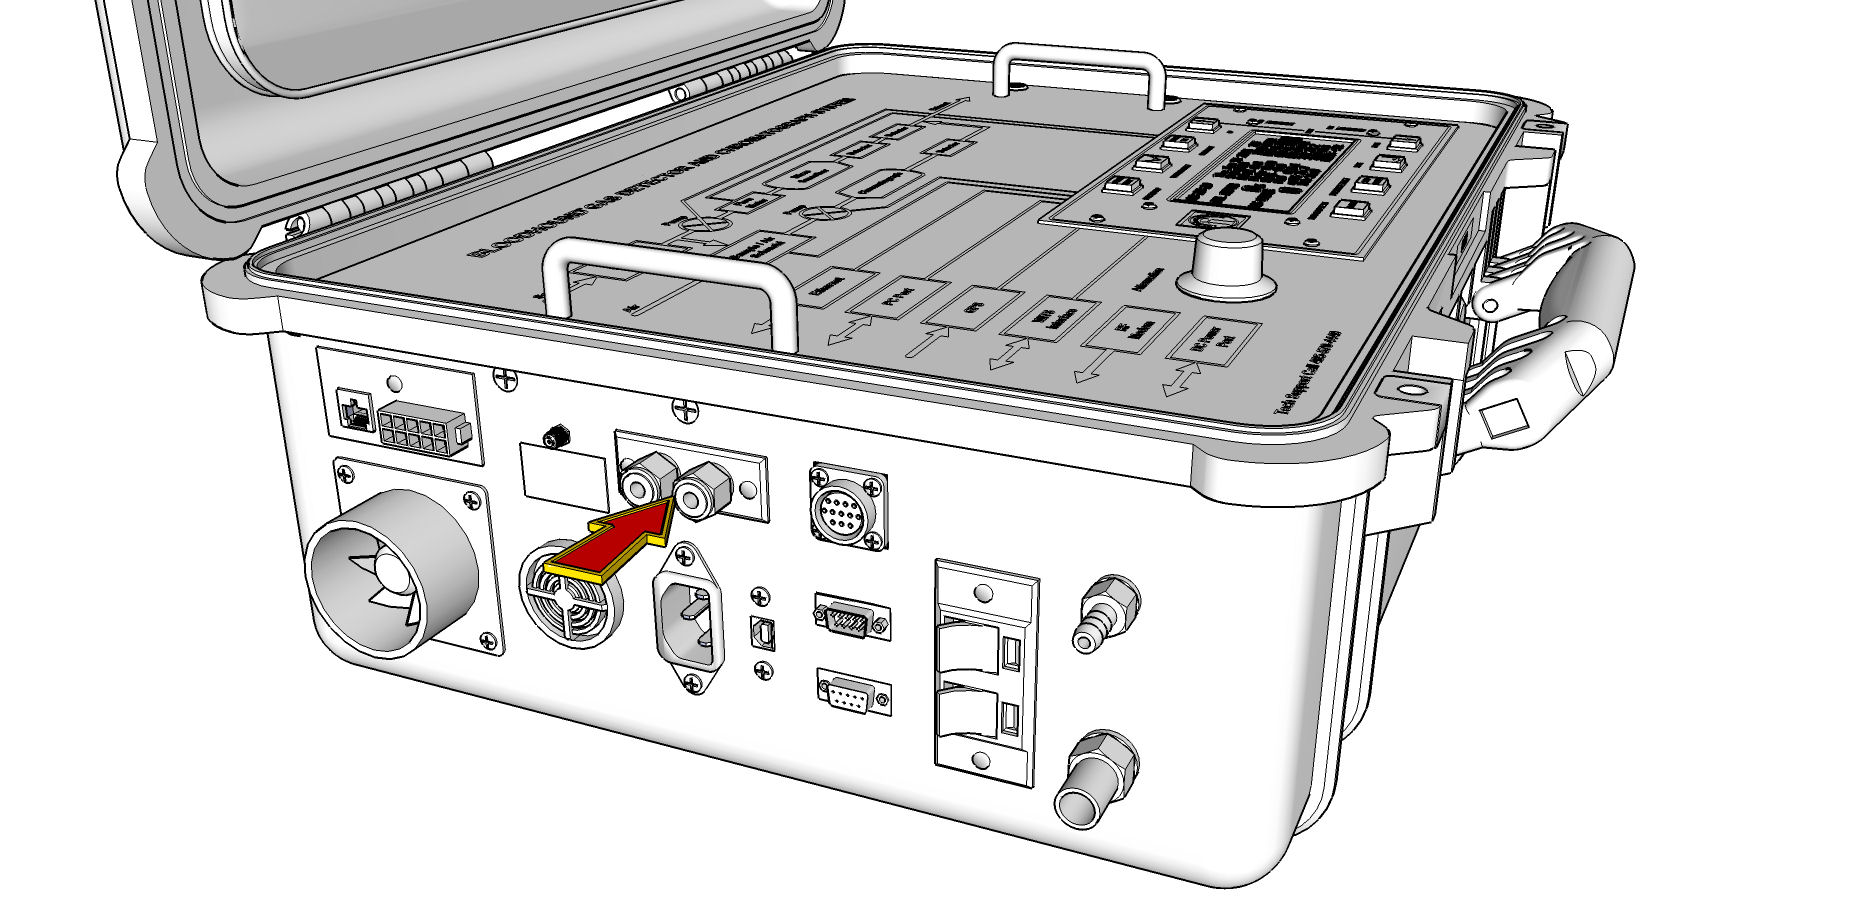
d) If your DC Cavitator is still not working, disconnect it from the power terminals on the Bloodhound and proceed to the next step.
3) Locate the DC Fuse:
a) Using a Philips head screwdriver, remove the 4 screws on the face of the Bloodhound shown in the locations on the figure below:
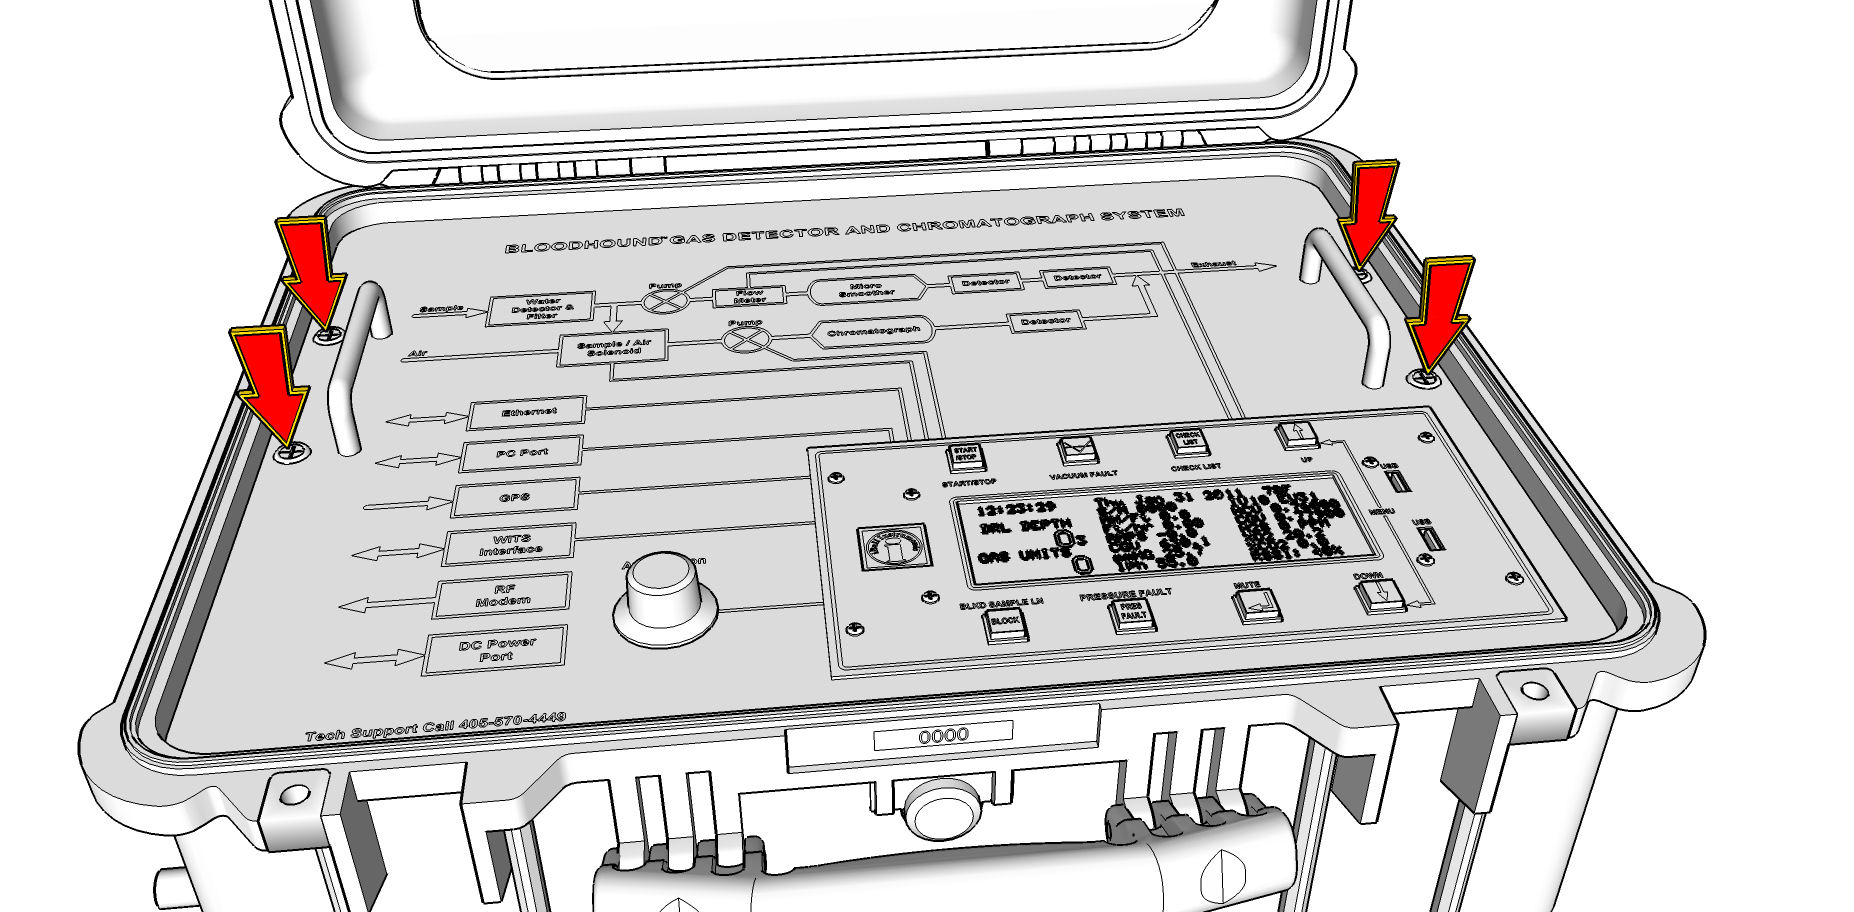
b) Tip the back of the face of the Bloodhound up toward you so that the wired connections toward the front are not loosened or disconnected by accident.
c) On the left-hand side of the Bloodhound almost directly underneath where the sample gas inlet is located, you should see either a black or silver fuse, measuring approximately 3/4 inch, by 1 inch, by 1/8 inch, plugged into a circuit board. (see photo below for what this fuse looks like):
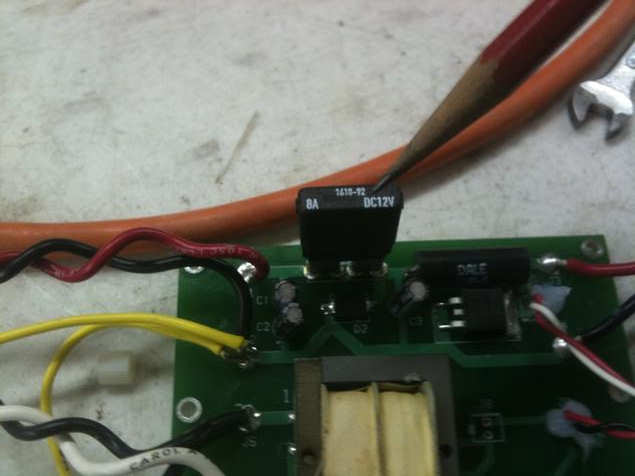
4) This fuse is a “circuit breaker” of sorts and can be reset. Assuming that it has simply been “tripped” and needs to be reset, let’s first try to reset it on-site. To do this:
a) Take specific note of what direction, and where the fuse is plugged in.
b) Grasp the fuse and pull it straight out of the circuit board to avoid bending any of the pins, and to completely remove/disconnect it from the circuit board.
c) Wait approximately 10 seconds.
d) Replace the fuse exactly as it was originally inserted.
5) Attempt to verify whether power has been restored:
a) Wait approximately 10 seconds.
b) Look at the Real-Time Data window again to see if the fuse has been properly reset and power restored to the DC circuit.
c) If power has been restored, you can re-connect the DC Cavitator to the power terminals on the Bloodhound, and continue.
d) If power has not been restored, proceed to the next step.
6) Replace the fuse:
a) You may replace the fuse in the Bloodhound with any of the following and you should get favorable results:
i) An original replacement fuse obtained through iBall Instruments.
ii) A fuse from another Bloodhound that is not using the DC Cavitator (if you do this, please leave a note on the Bloodhound to this effect so that when it is returned to the shop for maintenance, they know to replace the fuse).
iii) A 7.5 Amp or 8.0 Amp car fuse, obtainable at most auto parts stores.
b) Take specific note of what direction, and where the existing fuse is plugged in.
c) Grasp the fuse and pull it straight out of the circuit board to avoid bending any of the pins, and to completely remove/disconnect it from the circuit board.
d) Wait approximately 10 seconds.
e) Replace the fuse with the new fuse exactly as the original was inserted.
7) Attempt to verify whether power has been restored:
a) Wait approximately 10 seconds.
b) Look at the Real-Time Data window again to see if the fuse has been properly reset and power restored to the DC circuit.
c) If power has been restored, you can re-connect the DC Cavitator to the power terminals on the Bloodhound, and continue.
d) If power has not been restored, proceed to the next step.
8) The Bloodhound Power Supply or circuit board regulating power to the DC Cavitator is not properly working. You can either consider powering the DC Cavitator with an outside power source (such as a car battery, another Bloodhound, or an outside DC power source), or sending the unit in for service, which should be considered when the well is completed regardless.
9) OPTIONAL: You may need to recalibrate the built-in Ammeter:
a) Disconnect all load (the external DC Cavitator).
b) Run iBall Instruments’ Stand Alond Real-Time Data Viewer (RTDV).
c) Click the button that reads “More Data”. d) Clikc on the “Two Way Inactive” button.
e) Enter your Administrator Username and Password, and click the “Send” button.
f) Ensure that the button turns green.
g) Click down in the area with the yellow scrolling text.
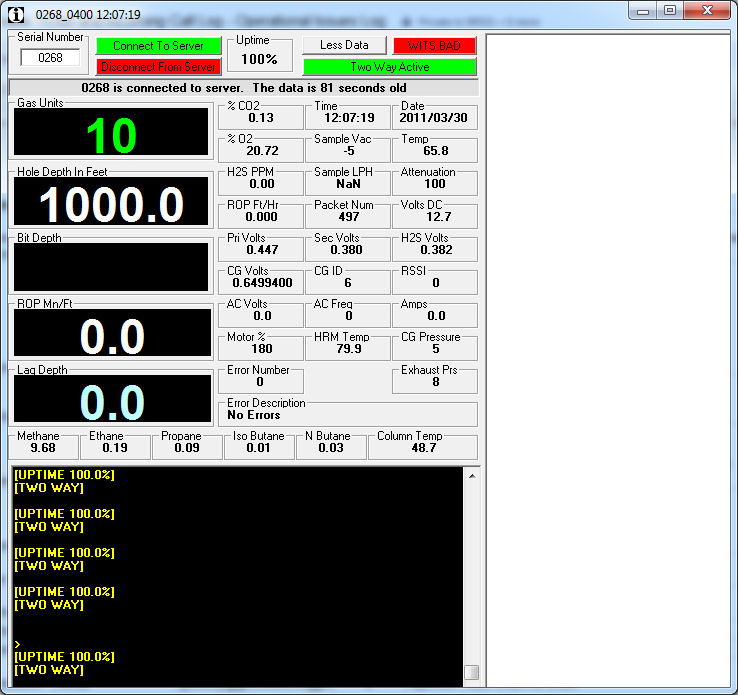
h) Type (you won’t see what you type), “calibrate amps” and hit ENTER on your keyboard.
i) Wait five (5) seconds.
j) Hit ENTER on the keyboard again.
k) Amps should now be zero (0).
10) OPTIONAL: You may reboot the Bloodhound at this point to ensure it is refreshed after the hardware changes.