This article specifically covers setting up a WITS connection between the Bloodhound and an on-site WITS system.
PREREQUSITES:
1) While it is advisable to have a Bloodhound on-site to run through the settings on the Bloodhound and the connections, it is not required – this can be an academic-only article as well.
2) You will need an RS/232 NULL Modem cable for the EDR-to-Bloodhound WITS connection, or a Pason “blue cable” RS/422 cable for the “Pason Blue Cable” WITS connection.
3) You may need to know how to set registers on the Bloodhound – if you do not know this, please consult the “OTHER ARTICLES OF INTEREST” section at the bottom of this article and look for the link to “How to (Locally) Set Registers on the Bloodhound”.
HOW-TO SETUP WITS ON THE BLOODHOUND:
1) CONNECT VIA RS/232 connection TO AN ON-SITE WITS EDR COMPUTER: If you have an on-site EDR computer, the best way to connect to WITS is through the RS/232 NULL Modem cable. Here’s how:
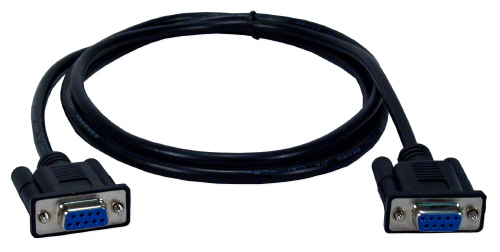
a) Your RS/232 NULL Modem Cable should look like this:

b) Locate the 9-pin serial port on the WITS EDR computer. Plug one end of the cable shown above into that connector.
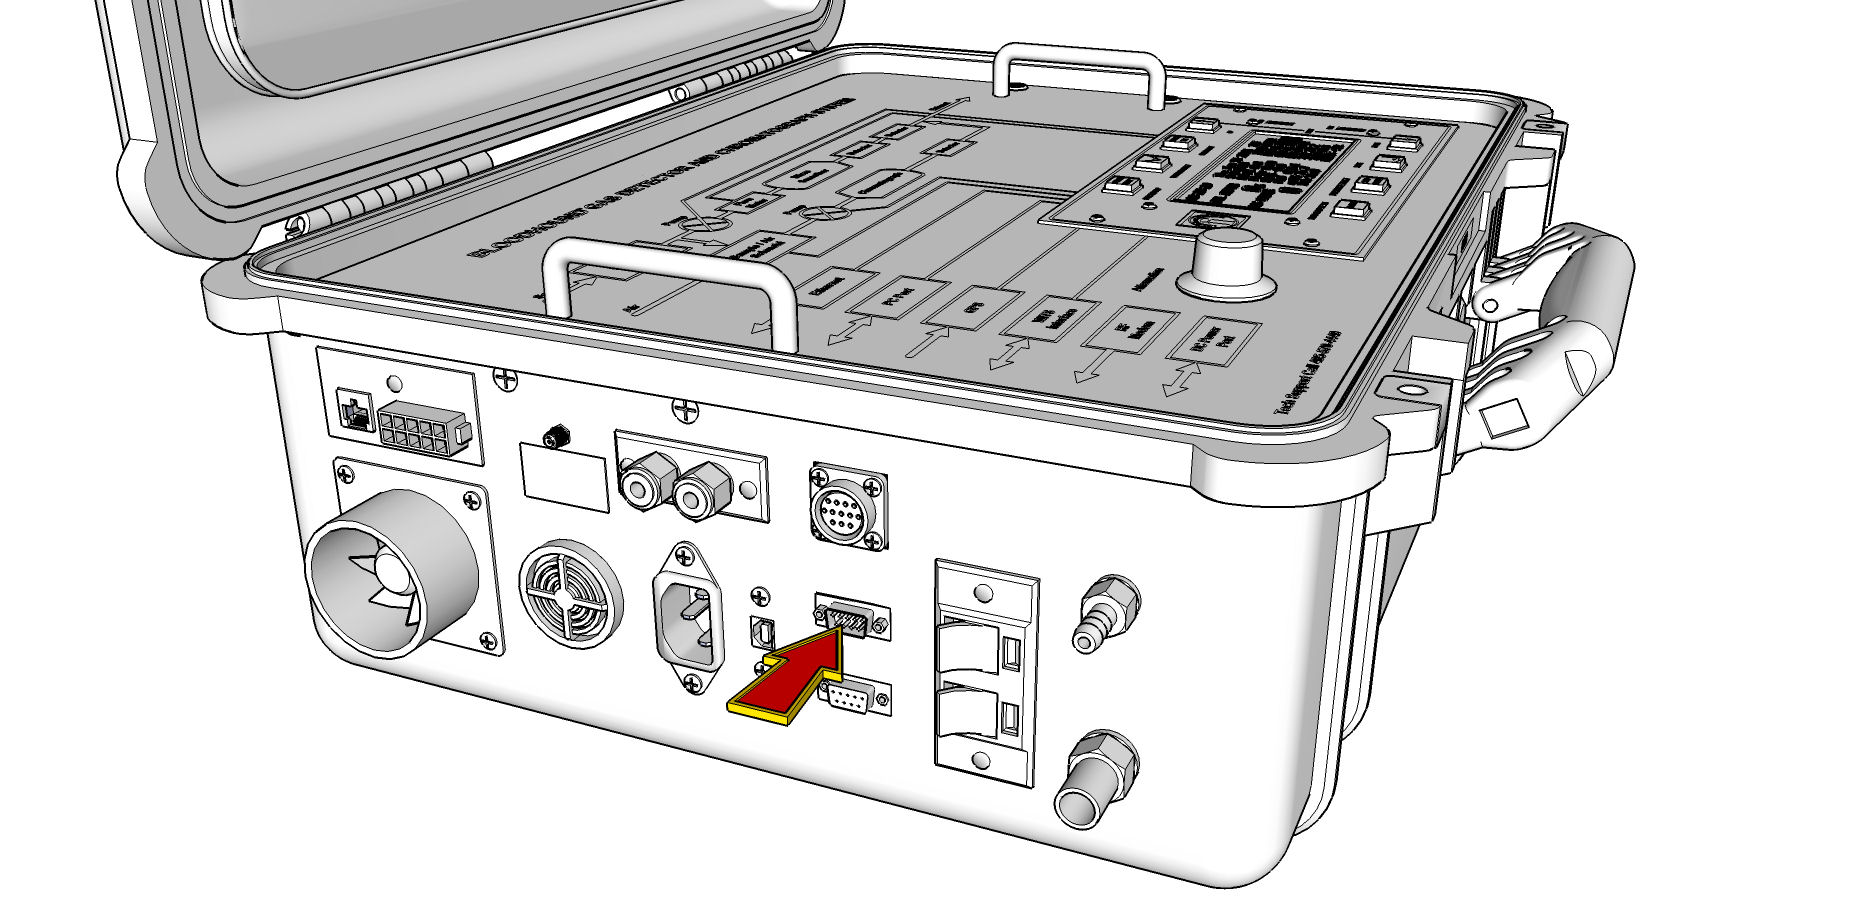
c) Locate the 9-pin RS/232 WITS connector on the Bloodhound – plug the other end of the cable shown above into this connector (a figure is shown below identifying this connector):

d) Now you need to understand (based on which WITS system you have) how to setup the Bloodhound’s registers to accomodate the specific WITS system. If you don’t know how to set registers on the Bloodhound, see the “OTHER ARTICLES OF INTEREST” section at the bottom of this article and look for the link to “How to (Locally) Set Registers on the Bloodhound”
Below is a table of the registers on the Bloodhound that relate specifically to WITS, and what their values mean:
| REGISTER | VALUE RANGE | DEFAULT | WHAT IT DOES |
| 12 | 1 or 0 | 1 | SEND GAS TO WITS: The Boolean one (1) or zero (0) equates to “true or false”. If set to false, then no gas data will be sent to WITS. When turned off, it sends no data, but does send a “NULL packet” to keep the WITS connection from timing out. |
| 26 | 1 or 100 | 100 | WITS OUTPUT GAS UNITS DIVISOR. This is either 1 or 100. Think of the reading on the Bloodhound being divided by either 1 or 100 before it is sent to WITS. In some WITS systems, they want to see percentage, hence the 100 is used. |
| 67 | 1 or 0 | 0 | WITS SENDING MODE: Mode 0 means that the Bloodhound waits to be “asked” for data by the WITS system (commonly called the “Pason Handshake”). Mode 1 means that every time the Bloodhound *can* send data to WITS, it will do so without being asked – it’s a “force feeding” of WITS information to the EDR. |
| 68 | 1 or 0 | 0 | WITS C-VALUE SENDING MODE: If set to zero (0), the C-Value Channels will be sent in “Gas Units”. If set to one (1), the C-Value Channels will be sent in PPM. |
e) Below is a table showing two example of WITS setup (register-wise). Identified are Pason and Totco – two very common WITS systems, and how the registers should be setup for these two respectively:
| REGISTER | PASON VALUE | TOTCO VALUE | WHY |
| 12 | 1 | 1 | SEND GAS TO WITS: If you’re hooking up WITS, it’s a fair bet that you want to send Gas to the WITS system. The only possible exception to this is if you want to run 2 instruments at the same time on the same WITS system, and you only want third-party gas from one of the two. |
| 26 | 100 | 1 | WITS OUTPUT GAS UNITS DIVISOR. For Pason this has traditionally been 100 and for all others 1; however, recent updates in Totco have clearly shown that in some cases they now expect 100 (it is configurable on their system). If your Gas Units are in PPM on the WITS system, try the other value for this register. |
| 67 | 0 | 1 | WITS SENDING MODE: This one is tricky. Pason and Totco have recently changed their systems…for many it will work in 0, and for many it will work in 1. Sometimes the setting of 1 will actually trip up the WITS system, so you may want to try 0 to start. |
| 68 | 0 | 0 | WITS C-VALUE SENDING MODE: Very few WITS systems expect the C-Values in PPM. |
f) You may skip step two (2) below.
2) CONNECT VIA RS/422 PASON CONNECTOR: If the WITS system is Pason, and they have run their standard “blue cable” around the site, you don’t necessarily need an on-site EDR computer to connect to WITS. Here is how to get this connection made:
a) You will need to have Pason or someone skilled with the Pason system get an active RS/422 connection brought into the mud logging trailer.
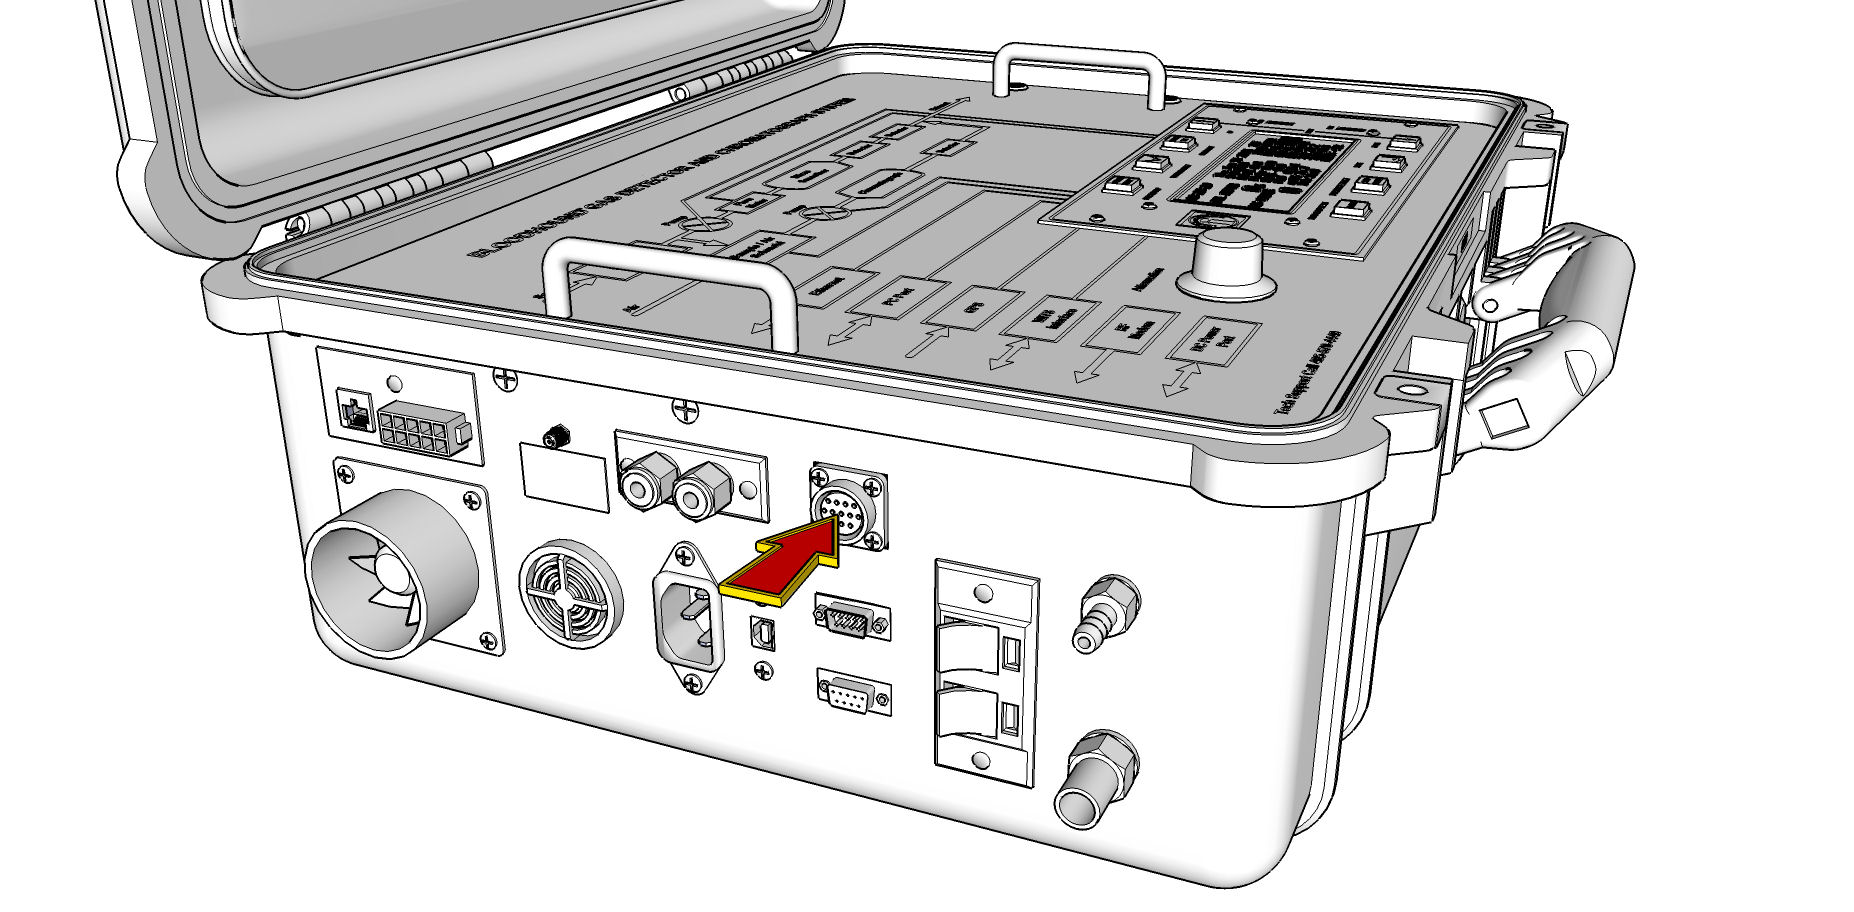
b) Connect the end of this cable directly to the matching RS/422 connector on the Bloodhound (see figure below for the location of this port):

c) See the table below for the registers and values that apply to Pason – you may need to set some of these registers depending on what the third-party-gas figure is showing up as on the Pason System:
| REGISTER | PASON VALUE | WHY |
| 12 | 1 | SEND GAS TO WITS: If you’re hooking up WITS, it’s a fair bet that you want to send Gas to the WITS system. The only possible exception to this is if you want to run 2 instruments at the same time on the same WITS system, and you only want third-party gas from one of the two. |
| 26 | 100 | WITS OUTPUT GAS UNITS DIVISOR. For Pason this has traditionally been 100 since they expect third-party gas in percent (%). |
| 67 | 0 | WITS SENDING MODE: Pason typically likes to see zero (0) in this setting since they are the “master” in the WITS system and the Bloodhound is a “slave” device. |
| 68 | 0 | WITS C-VALUE SENDING MODE: Very few WITS systems expect the C-Values in PPM. |
3) KNOWING INBOUND WITS CHANNELS: Now that the Bloodhound is setup, we need to make sure that the WITS system is sending the right information over to the Bloodhound on ANSI standard WITS channels. A table below is an abbreviated list of some of the key channels that the Bloodhound and supporting software expects certain pieces of data on:
| WITS CHANNEL | DEFINITION OF THE CHANNEL |
| 0108 | BIT DEPTH (Used to determine if “off bottom”) |
| 0110 | HOLE DEPTH (Used by BH to log data and by Gas Chart in ROP calc) |
| 0123 | PUMP 1 STROKES PER MIN (Used by Gas Chart to determine Pumps On/Off) |
| 0124 | PUMP 2 STROKES PER MIN (Used by Gas Chart to determine Pumps On/Off) |
| 0125 | PUMP 3 STROKES PER MIN (Used by Gas Chart to determine Pumps On/Off) |
| 0821 | LAGGED GAMMA (Used in Charting) |
| 0824 | GAMMA (Used in charting) |
4) KNOWING OUTBOUND WITS CHANNELS: Now that you know the minimum of WITS channels the Bloodhound expects to get from the WITS system, we now focus on the WITS channels that are sent by the Bloodhound to the WITS system as “third party” values for gas and the mix:
| WITS CHANNEL | DEFINITION OF THE CHANNEL |
| 0140 | TOTAL GAS (The TOTAL GAS number measured by the Bloodhound, as modified by the Attenuation on the unt) |
| 1212 | C1/METHANE The measured amount of Methane in pseudo real-time will be sent on this WITS channel. This is an interpolation of methane based on the last Chromatograph run’s percentage as calculated on the whole mix. |
| 1213 | C2/ETHANE The measured amount of Ethane in pseudo real-time will be sent on this WITS channel. This is an interpolation of ethane based on the last Chromatograph run’s percentage as calculated on the whole mix. |
| 1214 | C3/PROPANE The measured amount of Propane in pseudo real-time will be sent on this WITS channel. This is an interpolation of propane based on the last Chromatograph run’s percentage as calculated on the whole mix. |
| 1215 | IC4?ISO-BUTANE The measured amount of Iso-Butane in pseudo real-time will be sent on this WITS channel. This is an interpolation of iso-butane based on the last Chromatograph run’s percentage as calculated on the whole mix. |
| 1216 | NC4/NORMAL BUTANE The measured amount of Normal Butane in pseudo real-time will be sent on this WITS channel. This is an interpolation of normal butane based on the last Chromatograph run’s percentage as calculated on the whole mix. |
| 1222 | CO2 Measured CO2 by the Bloodhound is sent on this WITS channel. |
| 1225 | O2 Measured O2 by the Bloodhound is sent on this WITS channel. |
| 0141 | H2S If turned on and detecting H2S, the Bloodhound will send the measured value in PPM on this WITS channel. |
| 0139 | LAG DEPTH This channel communicates the current calculated lag depth. This will only work if you have your Bloodhound locally connected to an on-site computer via USB and running iBall Instruments Gas Chart software, and setup to calculate lag depth. |
5) VERIFY WITS IS GETTING TO THE BLOODHOUND: Now that you’ve got everything setup, we need to verify that the WITS data critical to the Bloodhound’s ability to log a well is reaching the Bloodhound:
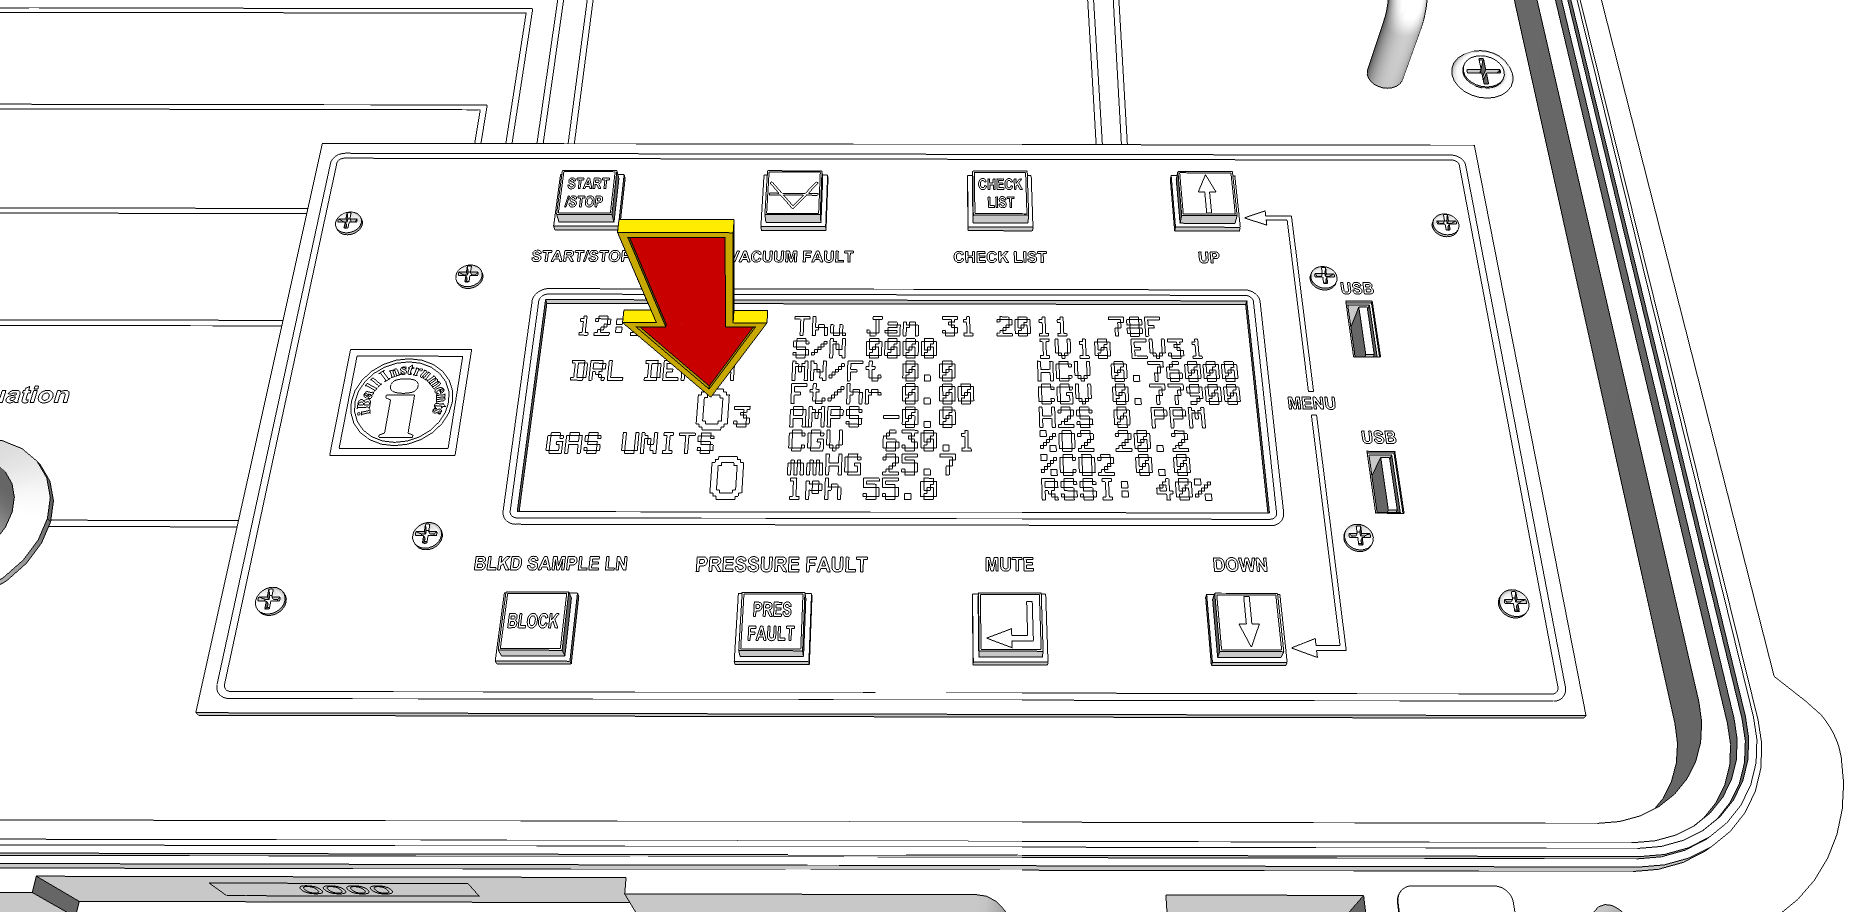
a) Look at the face of the Bloodhound and find the LCD panel.
b) If the depth shown on this readout (the location of which is identified in the figure below) matches that of the WITS system and is changing with the WITS system, then the Bloodhound is indeed receiving WITS data from the WITS system.

6) VERIFY BLOODHOUNG IS SENDING WITS: We also have to make sure the third-party gas is getting to the WITS system. Not knowing which WITS system you’re using, we can only speculate on how this is accomplished, but if you are getting *any* figure for third-party gas on the WITS system, then *all* potential items from the Bloodhound are available to the WITS system. What this means is that unlike WITS, the Bloodhound’s “WITS Channels” cannot be turned on or off – they are all always on, so if you’re getting Total Gas, then you should be able to get the C-Values as well.
Congratulations! You now know how to setup your WITS connection on the Bloodhound!