PRECONDITIONS/PREPERATION TO TROUBLESHOOT:
1) Gas Chart shows “WITS CONNECTED”, counts down to 0, and shows “WITS DISCONNECTED”, and the WITS informtion on the right-hand side of the real-time data window dissapears for this period of time while it counts down again, and then it re-connectes, and so on.
2) You *may* or may not see “BLOODHOUND DISCONNECTED” in Gas Chart, depending on how long the Bloodhound’s USB connection has been down, and/or if the problem is intermittent. There is a NOTE in section 1-d below that describes the nature of this warning.
3) For these diagnostics, you need to be on-site with the Bloodhound.
4) It would be handy to have an Internet connection, and to download the latest USB drivers for the Bloodhound from iBall Instruments (https://iballinst.com/ in the downloads section).
5) It is valuable to have a spare USB Printer cable for troubleshooting.
HOW TO:
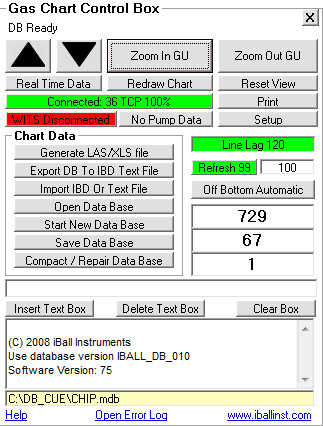
1) When you see “WITS DISCONNECTED” in iBall Instruments Gas Chart (see image below) but you do not see “BLOODHOUND DISCONNECTED”, it may be an actual WITS problem between the Bloodhound and the WITS system, or it may be the connection between the Bloodhound and the computer running iBall Instruments Gas Chart Software. You need to make this determination by Ruling out an actual “WITS DISCONNECTED” issue:
a) Go to the Bloodhound and look at its LCD panel on the top. If it is showing an accurate depth AND IS CHANGING in sync with the WITS system, then WITS and the Bloodhound are connected and the Bloodhound is reading depth and any other channels the WITS system is posting.
b) As a secondary check, you can also observe the WITS system to see if it is showing the third-party gas numbers and if these are in alignment with what the Bloodhound shows on its LCD screen.
c) If you have observed A or B above to be true, then the problem is not actually a WITS DISCONNECTED issue – it is a false positive from the Gas Chart system due to the high sensitivity of this particular warning – for more information see note below.
NOTE: The nature in which the “WITS DISCONNECTED” and “BLOODHOUND DISCONNECTED” red “lights” on Gas Chart show is such that you will always see “WITS DISCONNECTED” first. How they work is there is a “heartbeat” of information sent between WITS and the Bloodhound, and another heartbeat of information sent between the Bloodhound and the Gas Chart computer. It is the absence of data (or the absence of the heartbeat) that determines the connection is bad. While the heartbeat expected between WITS and the Bloodhound is only 10 seconds, the heartbeat between the Bloodhound and the local computer running iBall Instruments Gas Chart is 60 seconds. So for example, if you have a total outage on the USB line between the computer and the Bloodhound, you will see the “WITS DISCONNECTED” red light go on, then 50 seconds later, you will see the “BLOODHOUND DISCONNECTED” red light turn on. An even more confusing (and common) situation is an intermittent connection loss between the Bloodhound and the computer. In this case, you may only see the “WITS DISCONNECTED” light go on periodically, and never see the “BLOODHOUND DISCONNECTED” light go on.
2) Basic Hardware troubleshooting:
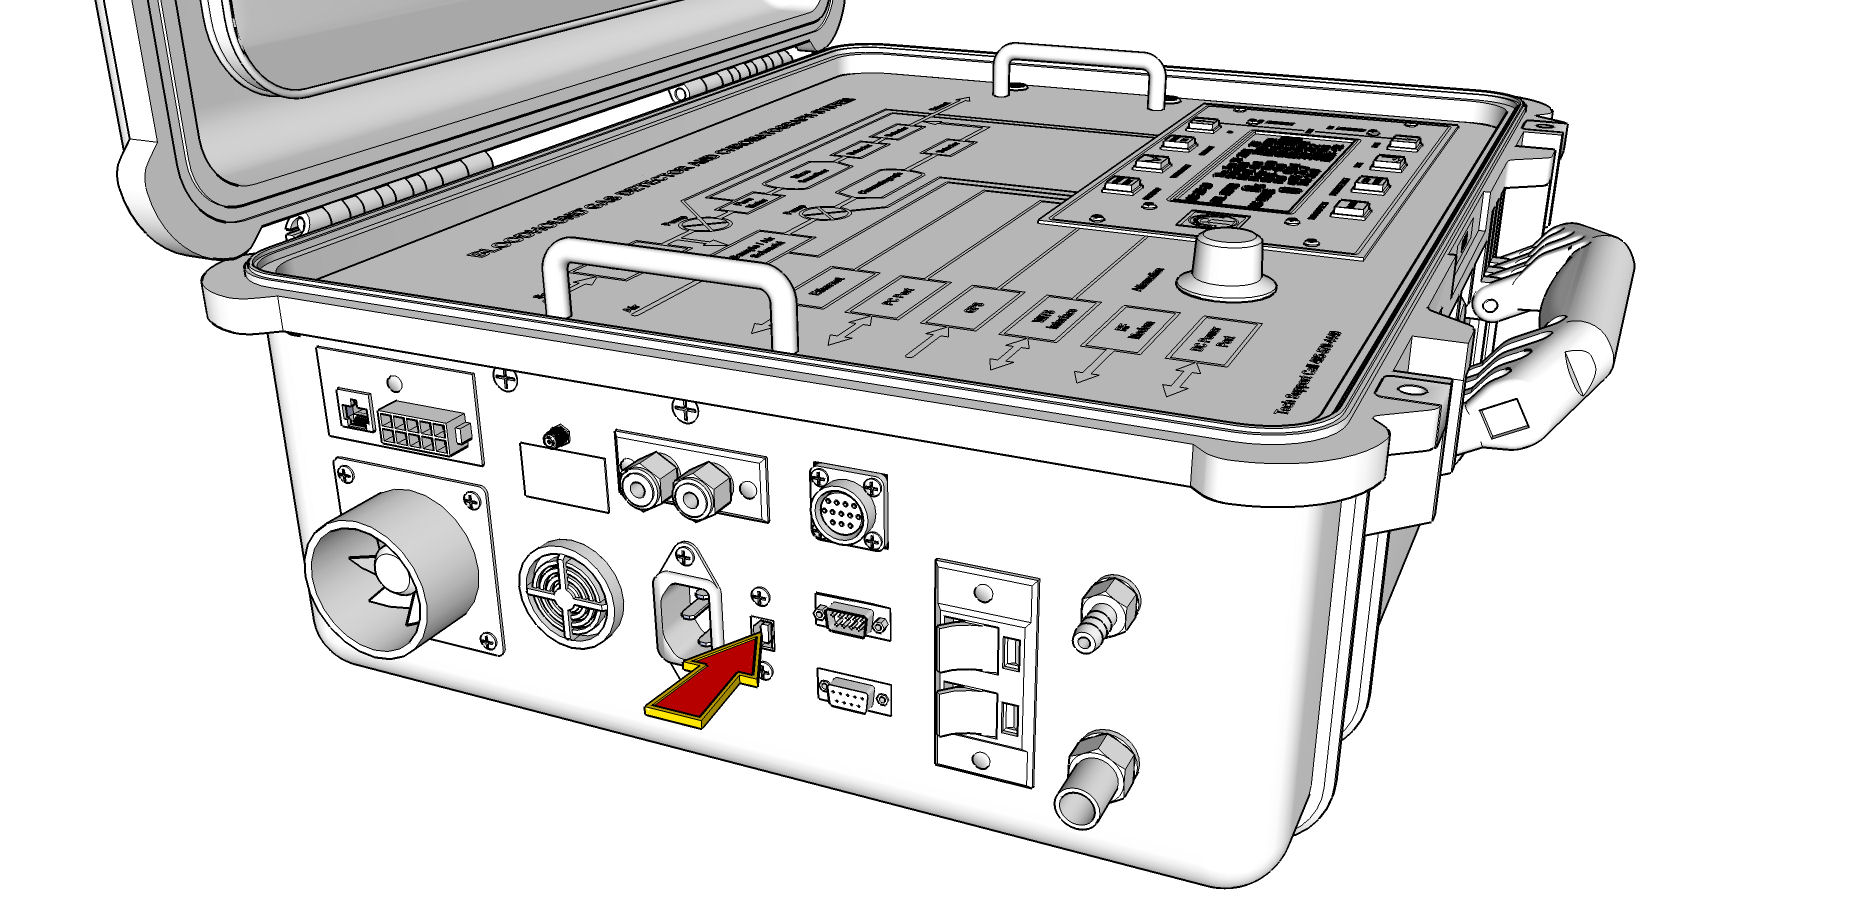
a) Double check the connections on both ends of the USB Printer Cable (between your computer and the Bloodhound – see figure below) to make sure they are tightly plugged in. b) Try a different USB port on your computer. Sometimes this will solve the problem. Be sure to give the computer a minute or two (depending on the speed of the computer) to recognize, allocate, and apply the driver to the port.
c) If you have a spare USB Printer Cable, try this in place of the current cable – it is not uncommon for these to wear over time and have some difficulty.
d) Using a flashlight, inspect the USB ports on the Bloodhound and on the computer. Look for any excessive dust, debris, or wear. Make sure there are no bent pins or other obvious defects.
e) If there is obvious obstruction or dirt/debris in the ports, try cleaning them out with a dry brush, a can of “air” (or an air compressor) and re-insert the connectors.
f) If there are bent pins, you can carefully try to bend them back into place with a pocket knife or similar small tool.
3) If this is still not working, try to install a new set of USB drivers. These can become corrupted with power outages, data anomalies, and other situations and many times the act of replacing them will solve the problem:
a) Get a copy of the latest drivers – If you have an Internet connection, do the following, otherwise, skip to 3-b below:
i) Open a browser and go to https://iballinst.com/
ii) Click on the “Downloads” button in the lower-right hand corner of the page.
iii) Download the USB drivers under the section titled “BLOODHOUND USB DRIVER”. Be sure to put them in a place that you can easily find them. Do NOT “Run” them from this location – it’s MUCH better to have a local copy for future use if needed.
b) If you don’t have an Internet connection, there is a copy on the USB Flash Drive that is plugged into the top face of the Bloodhound. It is best to do this when you are off bottom for a minute or two (a connection is fine):
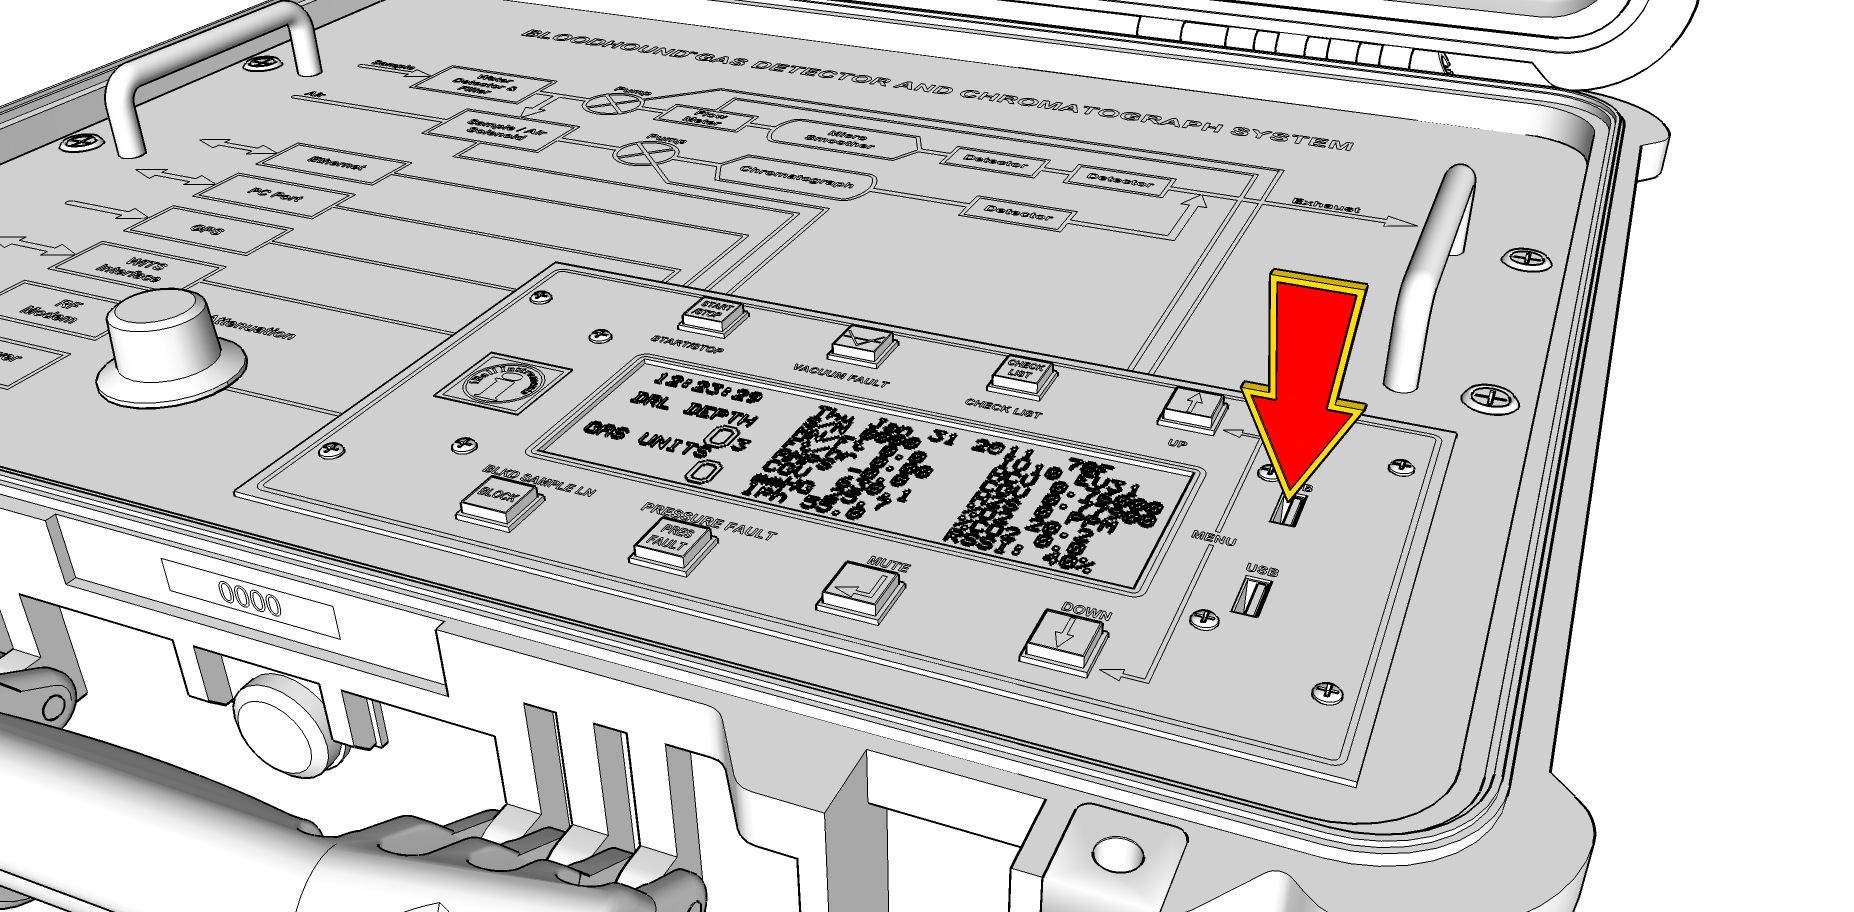
i) Find the USB Flash Drive that is plugged into the face of the Bloodhound to the right of the LCD display. Take CAREFUL NOTE of which port this USB Flash Drive is plugged into, and what direction it is facing. Also note whether there is an LED on the Flash drive (useful for returning the drive to its proper location. See image below.
ii) Unplug the USB Flash drive from the face of the Bloodhound.
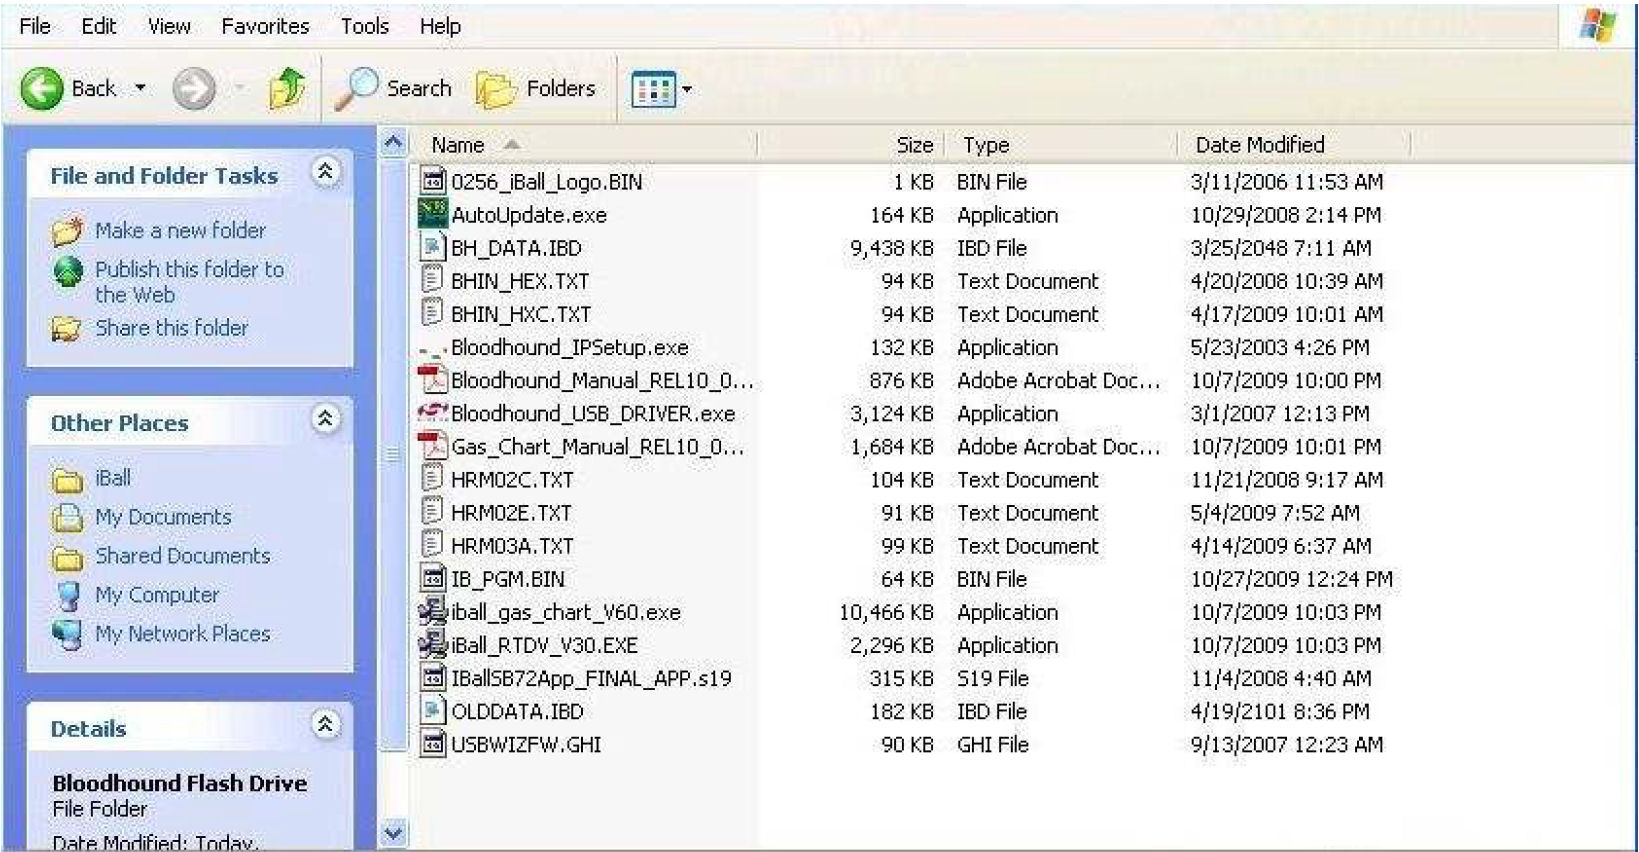
iii) Put the USB Flash Drive in a vacant USB port on your computer, and wait for the computer to recognize and (depending on your settings) open it. You will see a file called “Bloodhound_USB_Driver.exe” (See image below).
iv) Copy this file to a location where you can access it easily (such as your desktop)
v) Return the USB Flash Drive to its location in the face of the Bloodhound exactly as you found it. If it had a flashing LED when you took it out, make sure this LED begins flashing again (this ensures it’s in the correct port/direction).
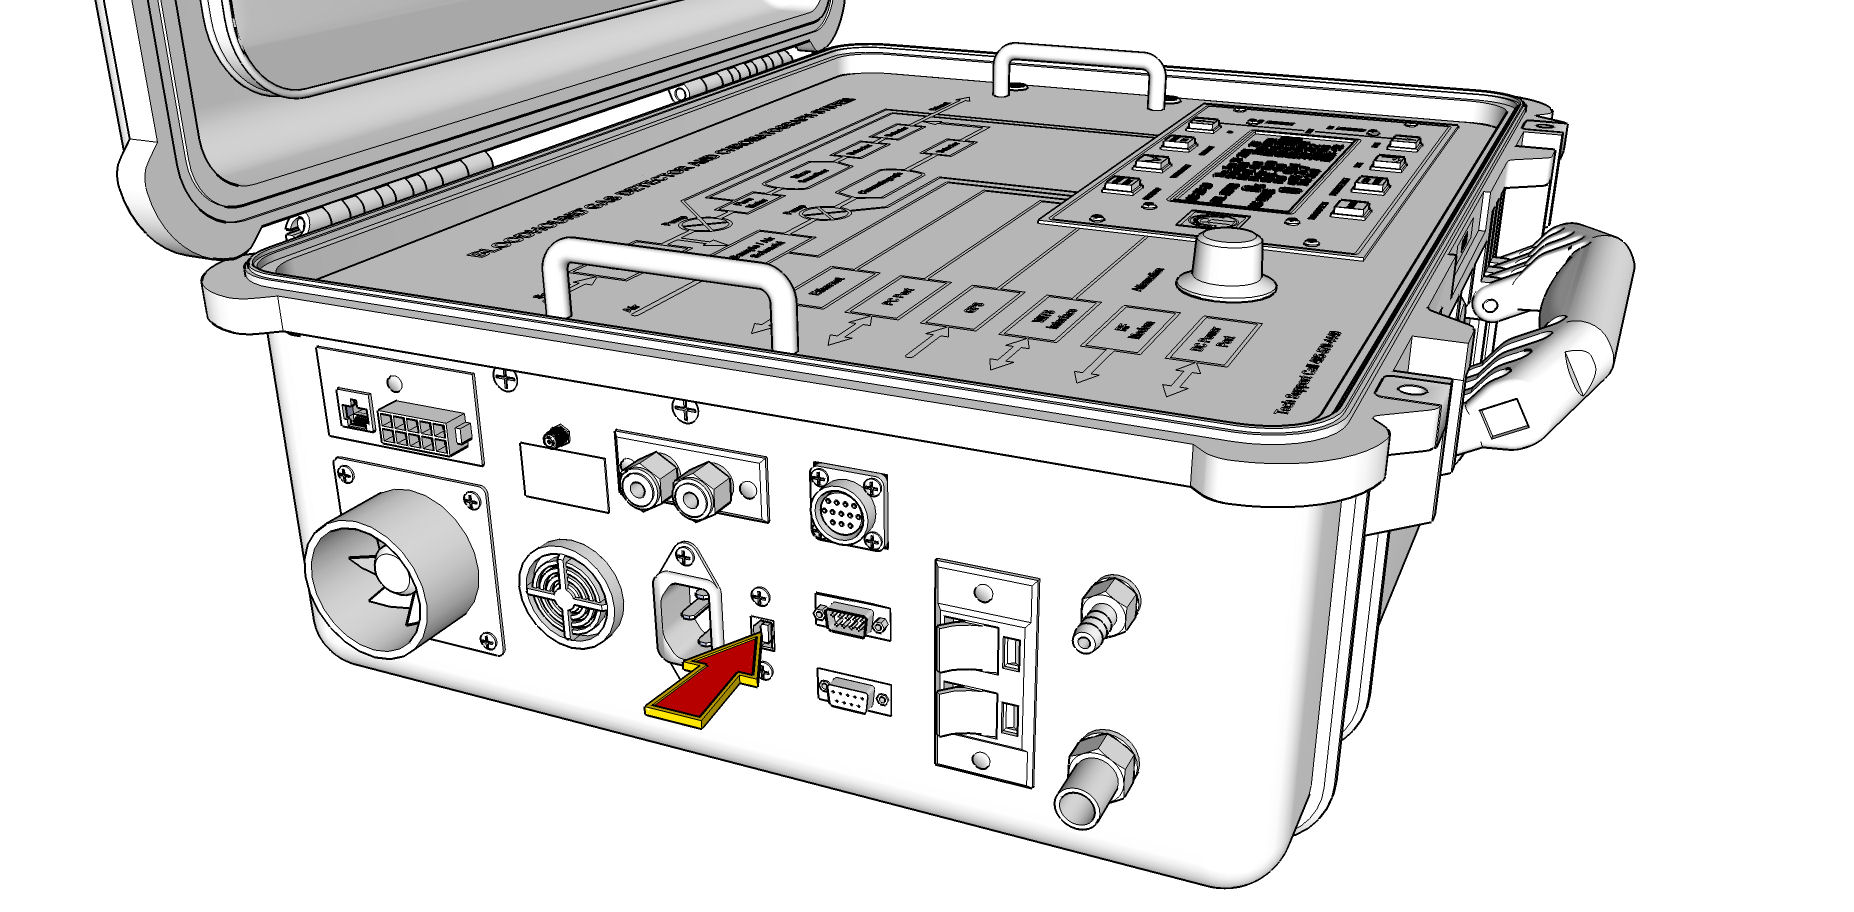
c) Unplug the USB Cable that connects your Bloodhound to the computer. You can do this at either end, but here is the picture of which port it plugs into on the Bloodhound as a reference:
d) Uninstall your current USB drivers:
i) Go to your Windows Control Panel.
ii) Depending on your version of Windows, it will either be under “Add Remove Programs–>Silicon Labs”, or “Programs and Features–>Silicon Labs…”
iii) Highlight the first “Silicon Labs” driver, and click “Uninstall”.
iv) Let the process complete.
v) NOTE: In a normal situation, there are two items starting with “Silicon Labs” and uninstalling the first item will uninstall them both. Regardless, you must make sure that all items starting with “Silicon Labs” are removed. If there are more, be sure to remove them with the same process above.
4) Reboot your PC.
5) Install the new drivers:
a) Locate the driver you either downloaded, or copied from the USB Flash Drive.
b) If you have Windows Vista or 7, right-Click on the install set for the Silicon Labs USB drivers, and choose “Run as Administrator”
c) If you’re running Windows XP or earlier, just double-click the executable.
d) Go through the installation process.
6) Test the installation by using the Windows Device Manager:
a) Open the Device Manager (right-click “Computer” or “My Computer”, and choose Properties–>Hardware–>Device Manager).
b) Open up the part of the tree that says, “PORTS” (if it’s there – if not, just scroll down to where PORTS will be alphabetically).
c) Plug in the Bloodhound USB cable and wait between a few seconds and a minute or so for the port to be allocated and the drivers to be loaded.
d) Verify that a COM port is created in the “PORTS” section when you plug in the cable, and that it dissappears when you unplug the cable (it shows up under the “PORTS” section in the aforementioned tree.)
e) Verify that this COM port is less than 16 in number
15) If everything has gone correctly to this point, Run Gas Chart and attempt to connect locally and see if the inconcistency is resolved.
16) If you are still having trouble, inspect the internal USB Port connections for any obvious loose or broken connections:
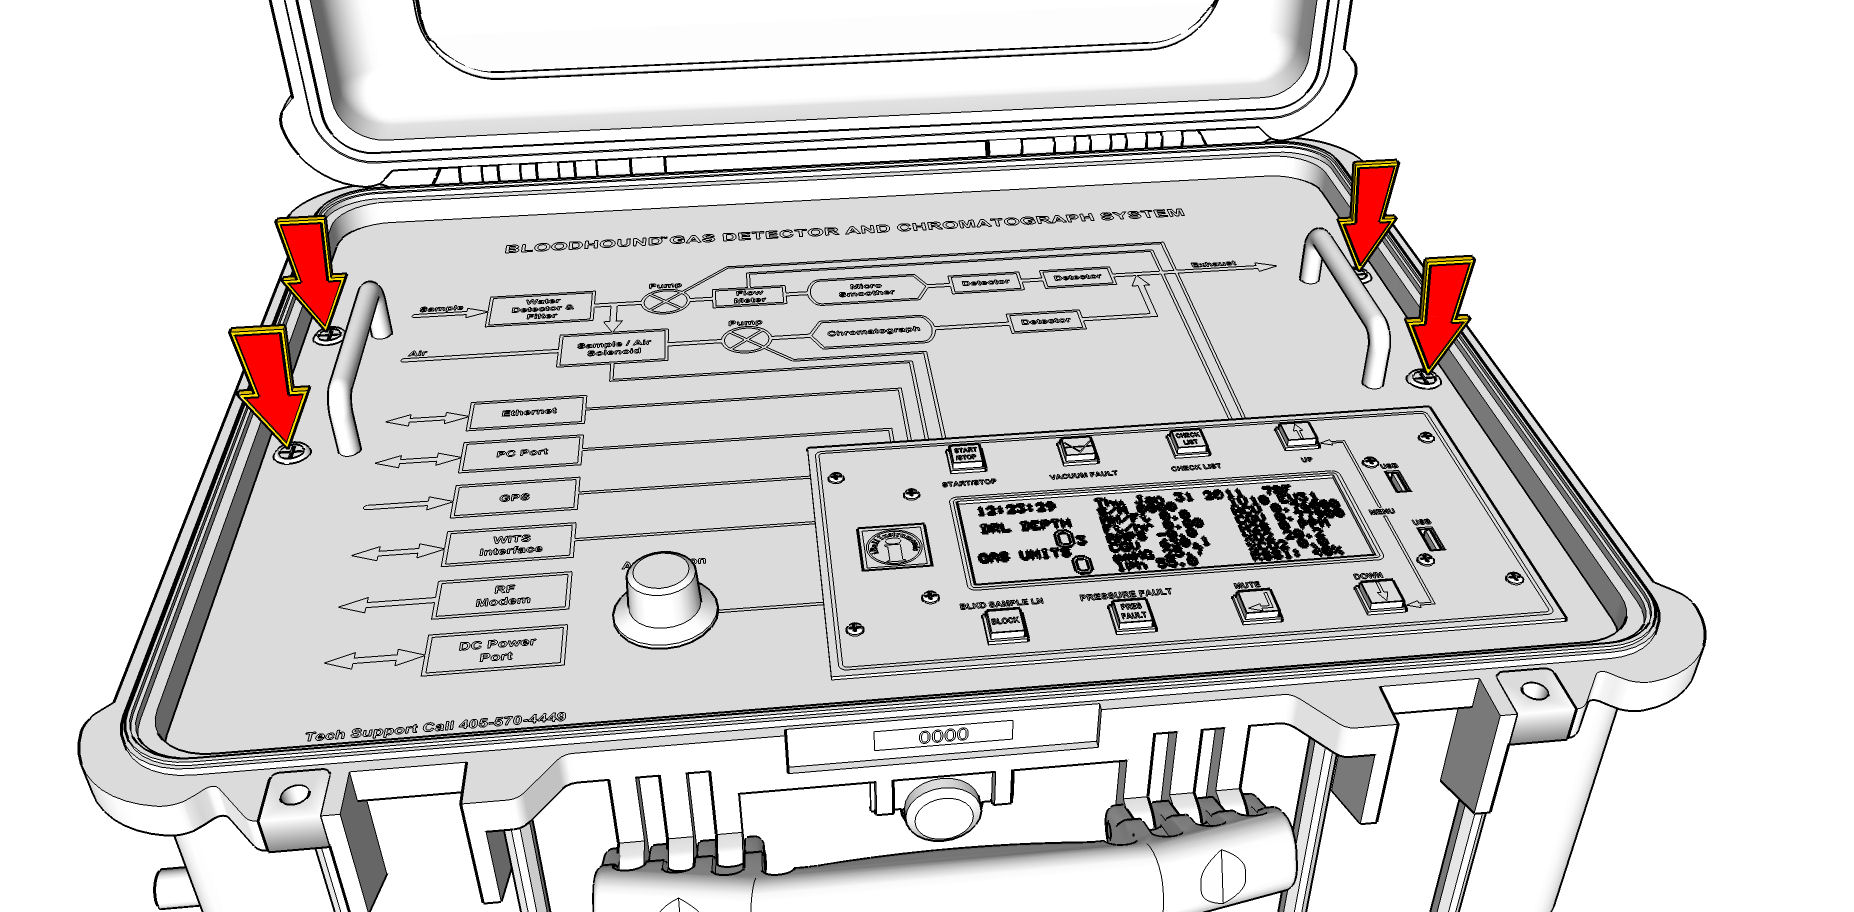
a) Open the Bloodhound by removing the 4 Phillips-Head screws from the face and tilting the lid back toward you (lift the back near the lid and keep the bottom section in place to make sure no connected wires are pulled loose – See figure below).
b) Using a flashlight, locate the internal connections for the USB port, and make sure the connectors have not become lose from shipping or other vibrations. You may tighten them or unconnect-reconnect if you are comfortable doing this.
c) Make sure the ribbon cable connecting these ports is in good shape and not broken in any areas.
d) After this, re-assemble the Bloodhound and try the steps above again to see if the connection is repaired.
17) If you are still having problems, contact Technical Support at 405 570 4449, option 2.